


Get In Touch
Do you have a questions or an issues we can help you with?
Let’s talk about your project and how Dohre can help get your tools designed, manufactured and ready for the market.


Reading volume: 233

Release time :2026-07-22
Estimated reading time:
Optical transceiver housings often contain narrow slots, compact cavities, connector openings, positioning shoulders, thin walls, and thermal contact surfaces. Machining these features requires careful control of cutter diameter, runout, tool reach, chip evacuation, burr formation, and finishing allowance.
Optical transceiver housings combine mechanical protection, component positioning, connector access, and thermal-management functions within a compact structure. Depending on the design, the metal housing may contain narrow slots, small cavities, mounting shoulders, connector openings, positioning surfaces, thin walls, and heat-transfer contact areas.
These features are small, but they can be demanding to machine. A cutter that is only slightly too long may deflect during side milling. Excessive runout can change the effective slot width, while poor chip evacuation may scratch the cavity wall or overload a small-diameter cutting edge.
Stable machining begins with the component drawing. Cutter diameter, cutting length, neck reach, flute geometry, workpiece material, tolerance, and surface requirements should all be considered before the end mill is selected.
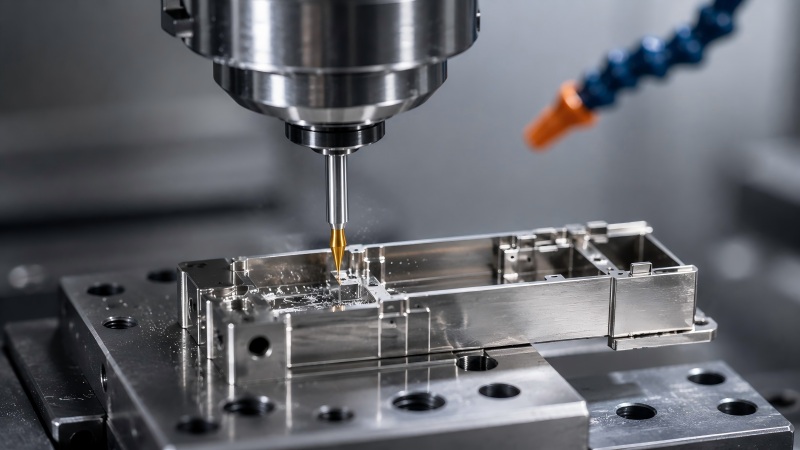
The manufacturing route varies between optical transceiver designs. Some housings begin as die-cast, extruded, stamped, or preformed components and then receive additional CNC machining. Other parts may be machined more extensively from metal stock.
End mills are typically used where the part requires controlled dimensions, accurate surfaces, small internal features, or geometry that cannot be completed reliably during the initial forming process.
| Housing Feature | Typical Milling Operation | Main Requirement |
|---|---|---|
| Small slots | Full-slot milling, side finishing, and corner cleanup | Stable width, clean edges, and sufficient chip evacuation |
| Precision cavities | Pocket roughing, wall semi-finishing, and bottom finishing | Controlled depth, wall position, corner accuracy, and surface quality |
| Alignment features | Datum surfaces, shoulders, positioning slots, and mounting steps | Repeatable position and dimensional consistency |
| Connector openings | Profile milling, corner finishing, and edge cleanup | Assembly clearance, edge quality, and burr control |
| Thin sidewalls | Progressive roughing, semi-finishing, and light wall finishing | Low cutting force and controlled deformation |
| Thermal contact surfaces | Flat-surface finishing and contact-face machining | Flatness, uniform tool marks, and clean surfaces |
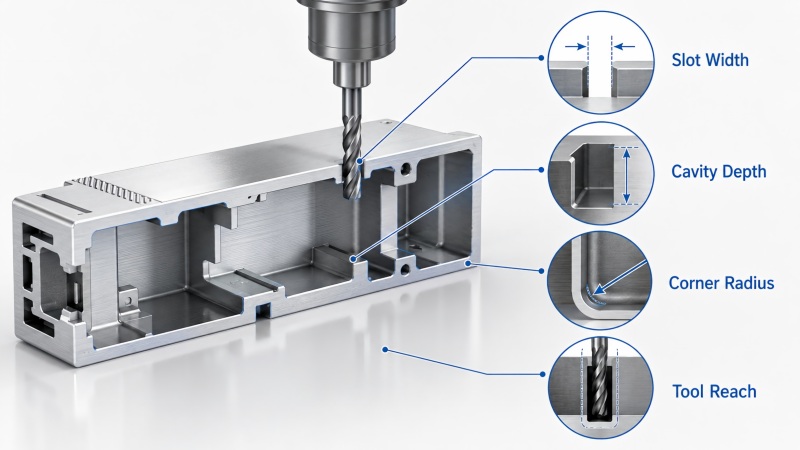
The description “optical transceiver housing” does not provide enough information to select an end mill. The actual slot, cavity, or positioning feature determines the required tool dimensions.
Before selecting the cutter, review the slot width, cavity depth, internal radius, wall thickness, required reach, entry position, surrounding clearance, and inspection requirement.
| Drawing Information | Effect on End Mill Selection |
|---|---|
| Slot or cavity width | Limits the maximum cutter diameter |
| Feature depth | Determines the required cutting length and reach |
| Internal corner radius | May require a smaller cutter for final corner machining |
| Wall thickness | Affects allowable radial force and finishing strategy |
| Surrounding clearance | Determines whether a reduced neck or special holder is required |
| Tolerance and surface finish | Determines whether separate roughing and finishing tools are needed |
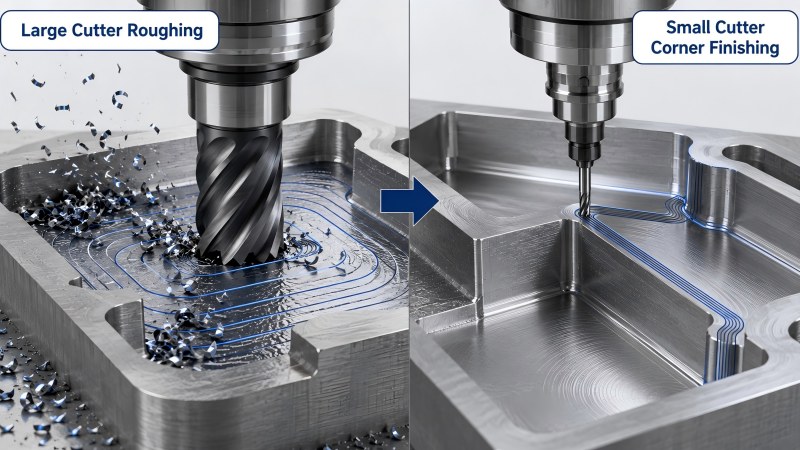
Small slots may be used for connector structures, latching features, internal clearance, component positioning, or assembly access. The cutter must fit the slot, but selecting the smallest possible diameter does not automatically improve accuracy.
A smaller end mill has a thinner core and is more sensitive to runout, bending, chip congestion, and sudden engagement. Where the geometry permits, use the largest cutter diameter that can produce the required slot width and internal radius.
When a small internal radius is required only at the end of the slot, most of the material can be removed with a larger cutter. A smaller end mill can then finish the remaining corner. This reduces the cutting load and operating time placed on the weaker tool.
Full-slot milling places cutting load on both sides of the tool and provides limited space for chips to escape. The process should use a cutter with enough flute space for the material and a cutting depth that does not overload the tool.
For a deep slot, progressive depth is generally more stable than cutting the complete depth in one pass. Chips should be cleared before the next layer begins.
Final slot width should be established with controlled radial engagement. A light side-finishing pass reduces the cutting load and helps correct minor wall variation left by the roughing operation.
The finishing allowance should remain uniform. If one side contains much more stock than the other, the cutter may deflect differently and produce inconsistent wall position.
A compact housing cavity may contain flat bottoms, vertical walls, corner radii, steps, and local positioning features. Trying to complete all of these surfaces with one long, small-diameter cutter may reduce process stability.
A more stable approach separates bulk material removal from precision finishing. Use the largest practical tool for the main cavity, then select a smaller cutter only for restricted corners, narrow areas, or fine details.
Roughing should remove material efficiently while leaving enough stock for correction. Stable engagement and chip evacuation are more important than reaching the final wall dimension during this stage.
Semi-finishing corrects the basic cavity shape and creates a more uniform allowance. This reduces sudden changes in cutting load during the final pass.
Finishing should use a cutter with a stable edge condition, low runout, and only the reach required by the cavity. The toolpath should avoid unnecessary dwell and repeated rubbing along the finished wall.
Positioning slots, shoulders, steps, mounting surfaces, and other reference features affect how housing parts and internal components fit together. Their value depends not only on the individual dimension but also on their position relative to other features.
Where practical, related reference surfaces should be machined in a stable setup to reduce errors caused by repositioning. The fixture, datum selection, tool length, and machining sequence should be planned around the features that are most important for assembly.
A worn cutter may continue producing an acceptable cavity while gradually changing the width or position of a smaller alignment feature. Tool-life control should therefore follow the first assembly-critical dimension that becomes unstable.
Cutting length, neck length, and total overhang affect tool rigidity in different ways. They should not be increased simply to provide extra safety clearance.
•Cutting length should cover only the material that the flute must machine.
•Neck length provides clearance from deeper walls or surrounding structures.
•Total overhang is the unsupported distance from the holder and should remain as short as possible.
A long full-flute tool may bend more than a cutter with a short cutting edge and a properly designed reduced neck. For deep but lightly engaged features, reduced-neck geometry can provide access while retaining more rigidity.
Runout causes the cutting edges to follow different paths. One flute may carry most of the cutting load while another flute removes less material or rubs against the surface.
On a small-diameter end mill, the runout value represents a larger percentage of the tool diameter. This can lead to an oversized slot, unequal wall finish, faster wear on one edge, increased burr formation, or sudden cutter breakage.
Before machining, inspect the collet, holder, spindle interface, tool clamping length, and contact-surface cleanliness. Measure runout close to the cutting edge rather than checking only the shank.
Small slots and cavities provide limited space for chips to leave the cutting area. Chips trapped between the end mill and housing can increase cutting load, scratch the finished surface, or damage a small cutting edge.
•Select a flute design with enough chip space for the material.
•Avoid excessive depth during full-width slotting.
•Direct coolant or air toward the cutting zone.
•Clear chips between progressive-depth passes.
•Do not allow chips from a roughing operation to remain during finishing.
•Inspect the flute for built-up material or adhesion.
Increasing spindle speed does not solve a restricted chip path by itself. Chip formation, flute space, cutting depth, and flushing direction should be evaluated together.
Optical transceiver housings and related components may use different materials according to structural, thermal, weight, and manufacturing requirements. The cutter geometry should follow the actual workpiece material.
Aluminum machining benefits from sharp cutting edges, low cutting resistance, sufficient flute space, and smooth chip evacuation. These characteristics help control built-up edge, burrs, chip packing, and thin-wall movement.
Dohre AEX aluminum end mills are available for aluminum slotting, pocketing, side milling, profiling, and surface-finishing applications.
Copper and similar ductile materials require a sharp edge and smooth flute surface to reduce material adhesion, smearing, burr formation, and surface scratching. Cutter selection should follow the actual alloy and operation.
Selected structural parts, fixtures, or mounting components may be made from stainless steel or other steel materials. These parts require a different balance of edge strength, coating performance, heat control, and chip evacuation.
A small burr can interfere with assembly even when the main feature remains within tolerance. Burr location often indicates the source of the problem.
A burr along the entire slot may indicate a worn cutting edge, built-up material, excessive runout, or unstable wall support. A burr concentrated at the tool exit may indicate that the cutter is breaking through an unsupported edge.
•Use a sharp cutter matched to the workpiece material.
•Control runout before reducing the feed rate.
•Avoid ending the toolpath at the weakest edge where possible.
•Support thin walls during slot and opening machining.
•Use a light finishing pass when edge quality is critical.
•Replace the cutter before edge wear creates unacceptable burrs.
Compact metal housings may contain walls that move under radial cutting force or excessive clamping pressure. A wall can appear correct while it remains clamped and then change position after the fixture is released.
Roughing should leave enough and relatively uniform stock for correction. Semi-finishing can establish the wall shape before a light finishing pass reaches the final dimension.
When several cavities or thin walls are present, remove material in a balanced sequence rather than completing one area while the surrounding structure remains solid. The fixture should support the housing without forcing it into a temporary shape.
| Machining Stage | Main Objective | Tool and Process Priority |
|---|---|---|
| Main cavity roughing | Remove bulk material efficiently | Use a rigid tool with stable chip evacuation |
| Small-slot machining | Create narrow slots and openings | Use the largest suitable diameter, short overhang, and controlled depth |
| Semi-finishing | Correct cavity and wall shape | Leave uniform stock and control wall movement |
| Alignment-feature finishing | Reach final position and dimensions | Use low runout, stable datums, and a predictable edge condition |
| Edge finishing and inspection | Control burrs and confirm assembly-critical features | Use light engagement and inspect after unclamping |
Small-diameter end mills do not always fail suddenly. The tool may continue cutting while the slot gradually becomes wider, the edge burr increases, or the cavity wall finish becomes less consistent.
Tool life should be controlled according to the first feature that becomes unacceptable. Depending on the component, this may be slot width, alignment-feature position, wall straightness, burr size, or surface finish.
For repeat production, record the material batch, cutter diameter, holder, runout, cutting data, feature depth, and inspection result. This helps separate normal edge wear from problems caused by chip congestion, fixture movement, or toolholding.
Standard cutters can machine many optical transceiver housing features, but compact structures sometimes require a combination of dimensions that is not available in a catalog tool.
A custom end mill may be useful for:
•A non-standard slot width.
•A deep cavity requiring a short flute and extended reduced neck.
•A special corner radius or wall transition.
•A stepped slot or combined profile.
•Restricted holder clearance.
•Several features that could be completed with one combined tool.
•A material requiring an application-specific edge, coating, or flute design.
Dohre provides custom and non-standard end mills according to the component drawing, material, slot width, cavity depth, corner requirement, tolerance, and machine conditions.
•Confirm the housing material and supplied condition.
•Identify assembly-critical slots, datums, shoulders, and mounting features.
•Check slot width, cavity depth, corner radius, and surrounding clearance.
•Use the largest cutter diameter that fits the required geometry.
•Match cutting length and neck reach to the actual feature depth.
•Keep total tool overhang as short as possible.
•Check runout near the cutting edge before machining small features.
•Provide enough flute space and chip flushing for narrow slots.
•Use progressive depth when full-depth slotting would overload the cutter.
•Separate cavity roughing, semi-finishing, and precision finishing.
•Leave uniform stock around alignment and thin-wall features.
•Control tool exit to reduce burrs around openings and weak edges.
•Inspect assembly-critical dimensions after unclamping.
•Consider a custom cutter when standard tools require excessive reach.
What type of end mill is suitable for small slots in optical transceiver housings?
A small-diameter square end mill is commonly used for flat-bottom slots. The diameter, cutting length, neck reach, flute count, edge geometry, and coating should be selected according to the slot and workpiece material.
Should the smallest possible end mill be used?
No. Use the largest cutter that can produce the required slot width and internal radius. A larger diameter generally provides better rigidity and dimensional stability.
Why does a small slot become oversized?
Possible causes include tool runout, cutter deflection, excessive radial engagement, long overhang, edge wear, or movement of a thin housing wall.
Why do small-diameter end mills break during cavity machining?
Common causes include excessive runout, chip packing, long overhang, sudden engagement, deep full-width cutting, unsuitable parameters, and using a cutter that does not match the workpiece material.
How can burrs around connector openings be reduced?
Use a sharp cutter, control runout, support thin edges, remove chips effectively, and plan the tool exit away from unsupported areas where possible. A separate light finishing pass may also improve edge quality.
When is a reduced-neck end mill needed?
A reduced-neck tool is useful when the cutter must reach a deeper feature while the non-cutting section requires clearance from the surrounding wall. The neck should not be longer than necessary.
When should a custom end mill be considered?
A custom cutter may be appropriate for a special slot width, deep restricted cavity, unusual radius, combined profile, limited holder clearance, or application that cannot be completed efficiently with catalog tools.
Small slots, precision cavities, and alignment features place high demands on end mill rigidity, toolholding, chip evacuation, edge condition, and machining sequence. Selecting a cutter only by its nominal diameter may result in unnecessary overhang, insufficient flute space, or poor access to the feature.
A stable process uses the largest practical cutter diameter, the shortest suitable cutting and neck length, low runout, controlled engagement, progressive depth, and separate roughing and finishing operations where accuracy is critical.
Dohre provides solid carbide micro-diameter end mills, aluminum-specific cutters, and custom solutions for optical transceiver housings, narrow slots, small cavities, restricted features, and precision component machining. Contact us with your component drawing, material, feature dimensions, tolerance, and machine conditions for tool recommendations.
Do you have a questions or an issues we can help you with?
Let’s talk about your project and how Dohre can help get your tools designed, manufactured and ready for the market.
By continuing to use the site you agree to our privacy policy Terms and Conditions.